Wednesday, April 27, 2011

My Cinco de Mayo project

I'm entering this submission in the Blog County Fair under the Mixed Media category.  Oops!!! I think I may have misunderstood the Blog County Fair a bit.  Not sure how many county fair's have tamales for sale...but maybe they do in the south.  Yikes!

As a Mexican-American, I find it pretty funny that people in the United States will not only celebrate a Mexican holiday but also give it new meaning.  Cinco de Mayo does not equal Drinko de Mayo.  Now, don't get me wrong, I like a good meal with cocktails, but the Cinco de Mayo holiday is rarely celebrated in Mexico (as it relates specifically to the people from the state of Puebla).

Cinco de Mayo commemorates the Mexican army's unlikely victory over the French in 1862.  It is not Mexican Independence Day (that's in September).

Anyway, I wanted to post a more positive Latino project that you can choose to make on Cinco de Mayo to honor the people of Mexico.  This tutorial is something I had created for an on-line magazine called Latin Webzine but they had some difficulty in moving forward with the piece, so I'll share it here. It's a fun way to create an embellishment to add to layouts that capture a huge family tradition - making tamales.


Step 1:
Use a paper scorer to score vertical lines on the tan colored cardstock. 


 I have recently discovered the Martha Stewart scoring board – it’s a favorite new tool.  If you’re going to invest in a scorer, I highly recommend you invest in this one.  It comes with a guide for how to make to envelopes and paper boxes.  It also allows you to score every 1/8 inch versus every ¼ inch.

A scoring tool is used to create creases in paper.  It’s normally used to help make a clean crease to make a card.  I, however, am using it here to create the lines of the corn husk.
So I scored the paper at every 1/8 inch. - the entire sheet.  It really doesn’t take that long (I promise).


If you aren’t ready to invest in a scoring board, you can also fold the cardstock on your own by using the edge of a ruler to make the crease cleaner.  It will be harder to make small creases, but the overall look should be about the same.

Step 2:
Using a blending tool with a foam attachment, I inked the foam pad with the Jim Holtz Antique Linen distress ink.  I heavily inked the pad and then blotted some off on a tissue so that it didn’t go on too heavy to the paper at first touch.


I then lightly stroked the blending tool across the tan colored cardstock on the side with the raised ridges created by the scorer.  I first followed the “grain” of the paper just to add a little color to the overall sheet.  Don’t be afraid if the color doesn’t go on evenly because it will look more like a real corn husk if it doesn’t.  Real corn husks have various coloring throughout – so just blend away.

I followed up by another light blending against the “grain” which allowed for more color to go on the ridges.


If you don’t want to buy a blending tool, I would try using a make-up foam applicator to achieve the same effect.  A cotton ball might work, but the ink won’t be as evenly distributed among the cotton fibers so it might be tougher.

Step 3:
Once the entire sheet has been inked, I used the scorer to create a perpendicular crease.


Step 4:
Depending on where you will use your paper tamale, cut a small section of the full sheet off.  For my project, I used about a 3 inch wide strip.


Step 5:
Fold in about ½ an inch of each vertical side.


Step 6:
Use scissors to cut that ½ inch section along the perpendicular crease.  Only cut that half inch on each side.


Step 7:
Some members of my family make flat tamales while others make pouch looking tamales.  For a scrapbook embellishment, I thought the pouch would be more intriguing texture wise.  However, if you want to keep the page as a flat as possible you can fold up the paper in half and glue the edge to the back.  It’s like creating a pocket.

To make the pouch-like tamale, you’ll have to first lightly spray the inside of your tamale (the non-inked side) with water.  Moistening paper makes it easier to fold into a pouch-like shape.  Trying this while the paper is dry will be difficult and the paper may rip.


If you don’t have a spray bottle, you can try using a wet paper towel to blot the cardstock.  The spray bottle helps to evenly mist the paper, but you can try other ways.  The trick is to not soak the paper but to make it damp.

Step 8:
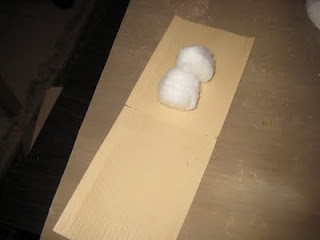
Once the paper is damp, place a few cotton balls in the inside to create the stuffing.  Depending on the size of the paper you cut out, you’ll need more a less than I show here.


Step 9:
I then folded in the top two ½ inch edges and folded up the paper to create a pocket.  I gathered the top and tied with a ribbon.  I glued the ½ inched edges to the back and trimmed anything peeking out at the bottom of the tamale to smooth out the bottom edge.


Finished product:
So your two final potential styles of paper tamales will look like this!


I used my pouch-like paper tamale to create a 12 x 12 inch scrapbook page of making tamales with my mom.  Depending on the size of paper tamales you make, you can use them on cards to invite folks to a tamalada, as decorations for an office Christmas party, or as part of way to remember a fun-filled day with friends and family.


Monday, April 18, 2011

Three Challenges with one Project: Flowers

I've discovered a new "challenge" site...and I was really excited to see that a lot (if not all) of their challenges revolve around creating layouts from sketches provided.  It's always nice to play around with other's vision and see the final product.

The Cricut Circle Blog weekly challenge and The Paper Variety Blog asked us to use flowers.  So I decided to marry the three into one project.

The Scrapbook Challenge's sketch 248 looked like this:


Instead of literally interpreting the sketch, I decided to incorporate flowers into the final design.  Here is what I created. Sorry the picture is so grainy...I'll have to retake one later to add here.  This is pretty bad resolution.


I had been toying around with making the twisted ribbon flowers, so I took the opportunity to try one here.  I think they are easier to make than rosettes, but they do require a bit of stitching to hold together.  I also twiseted the ribbon on the photo block to keep the theme going.

These are the cricut cuts I used for the layout.

Storybook
Flower1, Accent Blackout - 2 inches
Poppy, Shadow - 2 inches, 1.5 inches

Plantin Schoolbook
Flower, Shadow - 2 inches
Circle, Shadow - 1.5 inches, 1 inch
Flower, italic - 2 inches 

Sunday, April 17, 2011

Two Color Card Challenge - Card Cupids

This week's Card Cupids Challenge asked us to only use two colors.You could use variations of the same color.

If you know my typical style, you know that two colors and/or monochromatic cards are really tough for me.  So this was the perfect challenge.

I was all set to go when I realized that I, in fact, had three colors picked for the design I was planning to make.  Boy oh boy did that through me for a loop.

I eliminated my third color and stuck to a green & white card.  This was super tough!


Pooey!  The submission deadline passed.  Guess they are on the eastern time zone.  Oh well...it was fun being challenged to do something out of my comfort zone.

Sunday, April 10, 2011

I forgot to mention!

A couple of my friends asked that I send them my blog directly with each posting, so I'm posting this on here in case I haven't had the chance to mention it to them.

But I got word that another one of my cards is going to be published by Cricut!

The first card is going in their Birthday Idea Book, but my second card will be in the Card Idea Book (so it has lots of themes in the issue).

I'm so excited...it made my day on Friday.  Haven't stopped smiling all weekend!

Cricut Weekly Challenge #28: Creepy Crawlies Challenge

This week's Cricut Circle challenge asked us to create a scrapbook page about the things that bug us..and we had to use a bug somewhere on the layout.

I also used this challenge to try out one of the Jana Eubanks sketches -- loved that she shared these on her site.  I love her layering and I feel like her sketches really do mirror the types of things I like to do.  So it's super great to have printed out the 7 pages of sketches for inspiration!

I chose a sketch from the first page, and I decided to do a layout about WHY I do silly things with my friends and then have PROOF (as in a picture).  The picture below is from a fun-filled bachelorette weekend in Sedona/Las Vegas.  I think this church was in Sedona, and we weren't able to go visit it because it was closed, so I decided to search for God in the mailbox.  WHY?  Oh my....the things I do.  However, I gotta admit, this picture always make me break into a huge smile - guess the embarrassment of the proof was well worth the memory.


Here are my supplies

Paper
DCWV - The Ultimate Premium Stack (used papers from the summer and fall section)
DCWV - The Green Stack
The Paper Company - Black Cardstock
The Paper Company - National Fashion Colors

Other stuff
Ribbon - Celebrate It! by Michaels Stores, Inc.
Chatter Box Journaling Genie - #3 Funky (that's how I journaled in a swirl)
Beckham/micro-chip stickers, white chocolate chip

Cricut Cartridges
Create a Critter
mailbox - 3 inch
layer1, mailbox - 3 inch
layer2, mailbox - 3 inch
dragnfly - 1.75 inch
layer1, dragnfly - 1.75 inch

Plantin Schoolbook
circle - 4 inches
New Arrival
circlchrm, 1.5 inch
circle - 1.5 inch

Saturday, April 9, 2011

Dots and Stripes with April Showers

I stayed in this Saturday to do a little decluttering of the craft room.  I'll be moving to the upstairs unit in my building this month, so I'm really dreading the move of my delightful crap :)  As many of you probably know, the craft room is filled with stuff to play with so the idea of moving it seems so daunting (especially since it's not fully organized.

The plus side of moving upstairs...I'll get to reorganize!

Anyway, after I cleaned out a section of the room, I decided to tackle some projects for blog contests.  I was able to combine two contests in one project, so that I can soon start some of the other stuff on my list.

Today's project qualifies for the Card Cupids Sunday Challenge and The Paper Variety's picture inspiration challenge.  Here's the picture we were supposed to use as inspiration in creating our projects.


We were told we could be literal or we could pull elements from the page (like the color scheme).  I actually used the color scheme and found a blue print that had the same shape as the white flowers in the picture.  See?


The Card Cupids challenge asked us to use Dots and Stripes this week, so I made sure that my printed yellows and blues had that.  Pretty simple card to make, but I think it's super cherry to send off to Card Cupids for one of the kids that needs a little pick me up.  I'll need to make a few more cards to add before sending off, but they have a drive right now called April Showers of Smiles and Love...so I challenge all of you to make some cards and send them off to put a smile on someone's little face.

Thursday, April 7, 2011

Finally: A Project!

It's been rather hectic since I got back from my trip to Puerto Rico, so I haven't had much time to craft in my room. In fact, the state of scrapbook room was pretty chaotic itself as I had been working on wedding stuff the night before I left.  Of course, I hadn't touched it since then.

Well, tonight I decided it was time to create a little space for me to create a piece for the Cricut Circle Weekly Challenge #27: Make a Game Plan.

The purpose of this week's challenge was to force us to sketch out a design for a layout.  I sketch a lot for cards and often just wing layouts, so I knew this was going to be fun to try.

I was shocked by how difficult it actually was, but here is my sketch.  Sorry it's on notebook paper!

sorry it's on its side...I can't figure out how to rotate it.  The jpeg opens right but when I insert it, it flips!
 Anyway, I decide to play with rule of three and made sure that certain colors, elements and shapes were repeated in threes.  


This layout captures the joy I had in becoming a godmother to my first god-DAUGHTER.  Up until that point, I had only godsons, and I was excited to have someone I could do girly things with.  Azul (yup, her name means Blue in Spanish) has a wonderful twin brother, named Andy - so she was always a bundle of energy around him and still is.  I remember that that weekend was hot, humid, and long...no wonder she pooped out at the church!

I also wanted to incorporate a lot of blue into the page for her name....I'll have to make a more girly page later with lots of sparkle and embellishments because that is her true personality now-a-days.

My final version didn't exactly match what I sketched because I didn't draw to scale and quickly realized that I was going to have to work with what I cut (since I didn't have much of the coordinating paper).  The choices one has to make, right?

Here is the list of my supplies and cuts
Paper
DCWV - The Green Stack
DCWV - The Guy Stack
DCWV - The Jewel Colored Cardstock Stack
Paper Source - Eco White

Graphically Speaking
Image46s, 7 inches
Accent Essentials
Accent30, 1.25 inches & 1.5 inches
Accents1s, 1 inch & 1.25 inches

Plantin Schoolbook
Tall Ball font, 1.5 inches